Powered By Blogger

Monday 5 December 2011

Gwen Stefani's makeup looks

GWEN STEFANI

I would like to first start off by saying that I am a HUGE fan of Gwen Stefani. I have always loved her music, her bold style, and her makeup looks. Gwen Stefani is so original and creative, she definitly stands out from other celebrities to me. That's what I love most about her, she isn't afraid to be herself!

So these are some of my favourite Gwen Stefani looks!


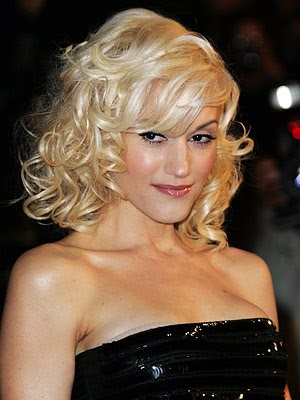
To me, this is a classic Gwen Stefani look. She has the bold red lip, with just the perfect amount of shine, not too shimmery, not too matte. She has black eyeliner along her top lashline and just a touch of black eyeliner on the bottom lashline. Then there is a shimmery white eyeshadow around her tear ducts. Her eyebrows look perfectly shaped and filled in with a light brown to go along with her white blonde hair. She doesn't wear to much colour on her cheeks. But I love her porcelain skin, it really works for her look. She has a bit of a rosy pink colour on her cheeks. This is a great evening look in my opinion, and it is an easy look to do. It's a five minute look that looks like you spent a lot of time doing.


This makeup look is almost the same as the one above (like I said "signature Gwen Stefani look"). The only thing that is really different in this look is she has more eyeliner on her bottom lash line than in the other picture. Her cheeks also look a bit more bronzy here. What I really liked about this look was her hair and her statement necklace. I love how she can pull anything off. Her hair is so unique and quorky but it really does work. If it was any other celebrity with their hair like this I would be like "What the heck were they thinking!" But for Gwen I make an exception. Like how do you get a bun to sit that perfectly on the top of your head?


I think this is a gorgeous look on Gwen. It's different than what she would usually do with her makeup, but it's nice to see her switch it up every once in a while. She has heavy eyeliner on her bottom lashline as well as her top lashline. The thing that really sticks out to me in this picture is her nude lips, since she is known for her red lip. She has a bit of gloss on her lips and maybe a hint of lip liner. Her cheek bone is very defined in this picture which looks very flattering. Her hair has been teased and kind of combed over a bit then flowers added to it makes it look so pretty.

This look is so different from her usual look because first of all, she has no red lip, and second of all, she doesn't always wear her eyeliner that thick. I think she looks more toned down here than she normally looks, which is kind of nice for a change. She has very thick black eyeliner on her top lashline then white eyeliner along the bottom lashline and of course mascara. Then she has a pale pink lip with a touch of gloss to finish the look. Again looks beautiful but doesn't take much time.


This is a very flattering look on Gwen and would also be flattering on anyone really. She has lovely dewy skin here and a nice bronzy, pink glow. The lip colour is very different from what we have seen before which is either red lip or pale lip. This is a more pinky natural colour. She has the eyeliner along her tp lashline again and a touch along the bottom but not too much. She has long eyelashes and almost no eyeshadow. Maybe a pale peach or white, it's kind of hard to tell. She looks so glowy in this picture, its stunning.

Over all, when looking through pictures of Gwen, I noticed she doesn't really play too much with coloured eyeshadows. I might like to see more colour on her eyes in the future but still, anything she does, she always pulls it off really well.

Thanks for reading!

p.s. none of these photos were taken by myself, they were all found online.

Wednesday 30 November 2011

Beauty photography

Hey everyone,

So I've been thinking about expanding my blogger acount with an additional blog for beauty photography. It would be less writing, and more photos. I've been thinking about starting this up for a little while now because I do love photography as well as beauty so I figured why not put the two together. It wouldn't be just regular beauty shots, it would be more intricate makeup. I'm going to try to record us doing the makeup and post those on youtube for those of you who would like to see how we created the looks. I want to go to extremes with makeup and really have fun with it. I have so many wild, fun colours that I have been dying to try but haven't found a place to wear them yet so this is my chance to really utilize all of my products and tools. I'm super excited about this project and I hope everyone else is too.

Please let me know what you think of this idea! If you have any suggestions or if you think it's a bad/good idea, PLEASE let me know!

Thanks for reading!

Wednesday 16 November 2011

The stippling brush


One of my latest favourite tools has been the stippling brush. I had heard a lot about the brush on YouTube and other blogs. So I decided to buy one off of eBay for around $4.00. Since I have started using the brush, it has been the only thing I have used to apply my foundation because it gets into every little crease and crevice on your face and gives you a flawless airbrushed look. On days where I'm just going to school or work, I don't like to wear heavy foundation so I will use a tinted moisterizer and use the stippling brush to apply it to my face. On weekends when I'm going out and I do want the extra coverage I use a high coverage foundation. Either way, the stippling brush does the job.

Now you might be thinking, "okay this brush sounds great, but how do you use it?"

So here's how you use the brush.....

1. I apply foundation to the back of my hand. You could use a plate or something else if you like, me personally, I like to use my hand.

2. I take the brush and dab it into the foundation, you don't need to press it hard into the foundation, just lightly so it picks it up on the tips of the bristles of the brush.

3. Then you dab it all over your face. It will look kinda funny at this point but in the end it looks nice. Again, DO NOT press hard just lightly dab it onto your skin.

4. Then you are going to take your brush and swirl the bristels into your skin to blend it in really well. I find that this gives an amazing finish, I like it a lot better than using my fingers or a brush. But that's my opinion, not everyone will feel the same way.

It seems like it seems like it will take a long time to apply your foundation this way, but once you get used to doing it, it doesn't take all that long. It's the results that count!

If anyone has any questions about the stippling brush just ask!!

Thanks for reading!


Monday 14 November 2011

Celebrity Makeup

I was reading some stories about celebrities online today when I decided to look at the makeup some celebrities have been wearing this year to get some inspiration. I found three looks that I think are absolutely beautiful.


I think the look that Gwen Stefani is wearing here is absolutely gorgeous, and unique!! I have to admit I am a HUGE fan of Gwen Stefani! She is a beautiful lady! Now I really like this look because it's really quite simple, its just a dark smokey eye with a bright pink lip. I am in love with bright pink lipstick lately so I am loving this look here. The dark eye makup really makes her eyes stand out on her face but the bright pink lip also stands out too. This is a very sexy look and definitly something I would wear on a night downtown to the clubs or a party.


I chose this picture because again, this is a simple look. Now normally Taylor Swift keeps her makeup looks pretty innocent looking and pretty. But, with this look, she went a bit more on the sexy side with the dark lined eyes. It is a very pretty look with a light coloured lip. She doesn't wear a stand out lip colour in this picture so her eyes are really the main focus. Her skin is absolutely flawless and dewy which is absolutely gorgeous!


I LOVE this makeup look because she kept it extremely simple. It seems like they kept her makeup pretty natural looking so her dress would be the main focus. It really shows how beautiful Amy Adams is naturally. This look is great for daytime and work. It is simple but elegant, not overdone. She has a natural coloured lip, lightly lined eyes, and a lovely rosey cheek. Perfect. It's simple and looks effortless. The main idea here is to work at creating perfect skin, then add a touch of blush, lip gloss, mascara and maybe a bit of liner.


Sunday 13 November 2011

My Top Three Favourite Youtube Makeup Gurus

I would like to first start off by saying that all three of these girls are amazingly talented! They are all really positive and I feel that they are really genuine people. Rather than some youtube gurus I see who seem snobbish and stuck up.


So my number one favourite makeup guru on youtube is......


KANDEE JOHNSON!!!!!!


If you have never heard of Kandee Johnson before, you need to go to youtube search Kandee Johnson and watch her videos then come back and finish reading this blog.
She has so much talent and I have seen such a wide variety of different makeup videos that any girl could wear. Kandee is so pretty it hurts sometimes. She is very in with the latest trends in makeup and is always creating new, amazing looks. She has been on youtube for quite some time now and I'm pretty sure I have watched all of her videos. EVERY SINGLE ONE!! She has such a positive personality and she is also a very original person. Her videos always make me smile and laugh. They always leaving me feeling very positive because that's the type of person she is. i can't even describe to you how much of a fan i am of hers. So if you haven't checked her out yet, you better go do so.


My second favourite makeup guru on youtube is........


MICHELLE PHAN!!!!!!!


Michelle is a beautiful BEAUTIFUL woman. She is so incredibly talented when it comes to makeup it's unbelievable. She makes everything look so effortless and perfect. Doing makeup is something this girl was born to do. She is extremely creative and quorky. Like Kandee, Michelle has been around on youtube for a very long time as well. I watch almost all of her videos. They are very original and not something you are going to find everyday on youtube. You can always count on Michelle when you want to find a creative one of a kind makeup look.


My third favourite makeup guru on youtube is......


PROMISE PHAN!!!!!


I think Michelle and Promise are probably pretty much tied. Promise is married to Michelles brother which is why they have the same last name. No they aren't sisters. Just sister in laws I guess. ANYWAYS, Promise is an extremely sweet girl and like Michelle, makeup comes to her very easily. And the girl can wear any makeup and it will look good one her!! The thing I love most about Promise is how she makes a lot of videos called "transformations" where she makes herself look like different celebrities or cartoons. It's really amazing how she can actually transform herself to look like someone else. Her youtube channel is definitely one I would suggest to people to look up. She is extremely amazing and its absolutely incredible how she transforms herself. She has so many transformation videos from taylor swift, to kim kardashian, and even bellatrix lestrange from Harry Potter. I always keep my eye out for new videos from her because I know it will be very entertaining and original. You can really see how much work she puts into her videos which tells me that she loves what she does.

Thursday 27 October 2011

My face makeup routine

When I go to do my makeup everyday, the most important thing for me is to start off with a flawless looking canvas. I know a lot of girls just slap on some foundation and call it a day. A lot of people might watch me do my makeup and be like "what in the H is she doing?". I take a lot of steps in my face makeup routine but it is well worth it. I notice a lot of girls makeup looking cakey or not the right clour for their skin. It is important to know how to achieve great looking skin using makeup.


So, here is my routine,


step one: I always start off with a fresh clean face. I can't stress this enough to people, you need to clean off ALL of your makeup from the night before!! It's so important!


step two: I use a moisterizer or a primer to prep my skin. I almost always reach for a moisterizer to prep my skin, but you can always use primer if thats what you like. I like to use St. Ives Moisterizer with vitamin E. Vitamin E is really great for your skin because it helps with acne scars and healing any acne on your face. I have really dry skin so moisterizer works really well for me. I would normally give the moisterizer a few minutes to really soak into my skin before i continue with the rest of my routine.


step 3: Next, I use a bb cream and I apply it evenly over my entire face and neck. I make sure there are no harsh edges and that it is blended really well into my hairline and around my ears. If you don't know what bb cream is then you can go check out my other blog on bb creams. I am a huge supporter of bb creams and I think everyone should use it. It is basically a tinted moisterizer that has a bit more coverage than most tinted moisterizers.


step 4: This step I skip on a day to day basis, I only do this step if I'm going out at night or I just want the extra coverage. I take my favourite MAC foundation and apply some to the back of my hand and use my stippling brush to stipple it all over my face. I like using a stippling brush because it really gets into every angle and crease to give you great, airbrushed looking coverage.


step 5: I use concealer at this point. I know a lot of people do it before foundation but I like to do it after foundation but before powder. Now I always use one of my high end concealers at this point so it usually blends really well into my skin tone. This could be different for other people. The places on my face I usually conceal is, under my eyes, around my nose (because it tends to be red) my eyelids to help conceal any veins and to create a base for eyeshadow, and then of course any blemishes I may have on my face.


step 6: I take a highlighter and put it on all the HIGH parts of my face. I put it down the centre of my nose, across my cheek bones, my brow bones, right about my upper lip, and just a bit on my chin. This gives a great dewy look to your skin. It helps everything look natural and not like you put a lot of effort into your makeup.


step 7: I take a face powder and apply it over my entire face and jawline to set myy foundation, concealer and highlighter.


step 8: Then I take my clinique bronzer (which is amazing!) and I LIGHTLY dust it over my entire face. I have very fair skin, and I am very picky about bronzer because it always ends up being very dark on me. I chose this clinique bronzer because it is close to my skin tone. My face is a bit lighter than the skin on the rest of my body so this is why I apply it over my entire face, to help it match. This bronzer also doesnt have much glitter in it so it doesnt look silly over your entire face. I use a kabuki brush for this.


step 9: Then I take the same bronzer and use a thinner, fluffy face brush. I suck in my cheeks and I use the bronzer as a contour for my cheeks. I make sure to blend this out really well. You dont want any harsh lines on your face. Keep it natural! This helps your face look slimmer and more contoured.


step 10: The final step in my routine is blush. Again, I have fair skin, so I always go for a light pink blush. I like to use elf blush products, they are very easy to blend and don't overpower my skin.


So this completes my routine, I didn't plan for it to work out to be ten steps. HAHA! I hope this helps someone out there. If anyone has any questions please feel free to ask me.


Thanks so much for reading everyone! :)

Wednesday 7 September 2011

my new favourite product

The other day I went to the mall with a friend and as we were wandering around I saw the LUSH store. I have been in the store before but I was very turned off by their prices. I looked at the soaps and i was like "ten dollars for soap?! Thats crazy," but i had heard from another friend about how great their products are. So i decided to give LUSH another try. As I started looking at things rather than prices I realized I was in trouble because I wanted to buy EVERYTHING!!

In the end I settled for a solid body tint in black stockings, a twilight bath bomb and a lip scrub in sugar lips. I absolutely love all 3 products.


The one that stands out most to me is the solid body tint in black stockings. I had never seen anything like it before and once I tried some on my skin, i knew instantly that i needed to buy it. It was $8.95. It seems a bit expensive, but i know that this bar will last me a longggg time. The great thing about this body tint is the fact that it moisterizes your skin as well as gives you a subtle shimmery glow. Its great for people like me who have very fair skin because it just gives you such a beautiful sun kissed look. I also like that it is a very subtle shimmer rather than an overload on sparkle which looks fake and silly to me. This product gives a more natural sun kissed look.

You might be asking yourself, "how do you use a solid body tin?" Well, all you have to do is take the small heart bar and rub it onto your skin, then use your hand to kind of smooth it around a bit. You can use it basically anywhere you want. I use it mostly on my face and arms, but I have used it on my legs as well.
This is probably one of my favourite buys from this summer! I would recommend that EVERYONE try it!! Let me know what you think of course.

The bar is also very portable, I just leave it in the LUSH bag it came in and throw it into my purse or makeup bag and I'm good to go. It takes like 10 seconds to apply and it smells AH-MAZING!! It's a very sweet but spicy smell at the same time because it has spicy pimento berry oil and cinnamon in it. This will definitly be something I will probably buy over and over and OVER again! This is how much I love it. I seriously can't praise this product enough. Of course, I could be different than other people and everything in this blog is all my opinion so some people might love it as much as me but others might hate it. YOU NEVER KNOW!

Thanks for reading!!!

Tuesday 6 September 2011

which cosmetic could I not live without?

I was thinking this morning on my way to school about what kind of makeup product I could never live without. So I thought about it and which product would make help the most if I couldn't have anything else.

No it wasn't foundation or concealer, not lipgloss or eyeshadow. I felt like the product that would benefit me most if I could only use one would be mascara.

Mascara made the most sense for me because it helps give girls that more feminine look. It gives girls a pretty yet simple look.

It wouldn't matter if I had a zit or redness because I would have mascara on which would bring more attention to my eyes rather than any blemishes I may have.

Mascara is my favorite part of my makeup routine because it helps make your eyes look so big and doll like.

I wanted to talk about this today to help get everyone thinking, so think long and hard about what product or makeup tool you couldn't live without. You can only pick one!!

Thanks for reading!

My first day back to school look!!

Today was my first day back to college for my last year of Journalism. I was really nervous to go back to school, but excited at the same time. The night before, I was trying to plan out what I was going to wear and how I was going to do my makeup. I didn't want to be too fancy or too over the top. I wanted to look cute, but professional at the same time. Afterall, I'm not in high school anymore.


So starting off with my outfit from the bottom up. On my feet I wore a pair of gladiator style sandals from aldo. These shoes are my all time favourite shoes!


For pants, I wore a dark wash pair of skinny jeans from Sirens Fashions. I have had these jeans for like 3 years and I still love them.

\

For my shirt I wore a slouchy bright blue quarter length sleeve shirt. It's very lightweight and soft material. It looks very nice for school but its still comfortable at the same time. I bought the shirt a couple weeks ago at Urban Behaviour for around $8.00 which was really cheap so I bought it in white as well. lol!


For a necklace I wore a seahorse necklace on a silver coloured chain. I wore this because me and one of my best friends bought them as best friend necklaces and we promised each other we would wear them on our first day of school this year as good luck. Silly? I know but hey, no one ever really completely grows up right. Plus the necklace added a little bling to my outfit.


For makeup, I did my usual face makeup routine with bb cream, concealer, powder finish, bronzer and a bit of blush. I wanted to keep things simple because my program is more of a business environment so I just wore a shimmer white shadow to help make my eyes stand out, then my falsies mascara by maybelline and mac's black eyeliner. So nothing too crazy with the makeup today. I kept my hair pin straight today just to give that polished off look.


Overall, I really liked my look today. I got a lot of compliments from the other girls at school so I think it was successful! :) Check out my twitter account to see pictures of my outfit!


Thanks for reading!

Monday 8 August 2011

My Beauty Diary Face Masks! How to use them

I have recently discovered the asian face masks called my beauty diary. they are really popular in asian countries. I was hearing and seeing a lot about them over youtube so I decided to try some out.


I bought 2 different kinds, the green apple masks and strawberry yogurt masks.


The green apple masks are supposed to help with tightening pores. I'm not sure how well it really tightened my pores though. However, it did make my skin feel really soft afterwards.


The strawberry yogurt masks are for whitening and brightening, as well as moisterizing your skin. I really love this mask, it smells fantastic (literally smells exactly like strawberry yogurt!), really does whiten my skin and definitly moisterizes it.


All of the my beauty diary masks are sheet masks and they say to leave them on for about 25-30 minutes. I like to leave mine on for around 40 because i find that it works better that way.


Each mask is individually packaged and is coated in serum. After I apply the masks, I like to put any extra serum left in the package  on my neck. I just put the serum in my hand and massage it into my neck.


After taking the mask the mask off you are not suuposed to wash any of the serum off your face. You just leave the serum on your face to soak in. I like to massage my face for about a minute afterwards to really make sure that the serum gets into my skin really well.


Overall I really love these mask and i would recommend them to anyone. The only thing bad I could say is that the instructions on the packaging arent that easy to read because its in a different language. I mostly found out how to use it by looking it up online.


Definitly worth a try! Thanks for readinggg :)

Friday 5 August 2011

my YouTube channel!!

Today I am so excited to talk about my YouTube channel!! So a couple days ago I hit the 250 subscriber point! EXCITING! I know ! Now I am 5 subscribers away from 300!!


My YouTube channel is a beauty channel. I talk about everything that has to do with beauty, just like this blog! But on my YouTube channel you can actually see me and watch what i'm doing instead of reading it. I have some tutorials, hauls, and reviews!


I started my YouTube channel at the beginning of this summer to give myself something to keep me busy throughout the summer. Since I love beauty related things and I was watching makeup videos at least twice a day, I decided I could do videos as well. I am constantly trying new products so I figured why not share it with the world. So far it has worked out really well for me!


So for anyone out there that wants to start a channel you should Definitly go for it! I am so glad I did, I have made new friends and learned so much from it. It's kind of tricky at first when getting started but there are so many videos on YouTube that give you step by step instructions on different things to help you learn!


here's the link to my YouTube...


www.youtube.com/user/Jordynne91


so please check it out and subscribe to my channel!! let me know what you think!

Wednesday 3 August 2011

My purple newspaper nails!!

I have seen this look for nails quite a bit lately over blogs, and over youtube. It seems to be pretty popular lately so I decided to give it a go. I wanted to add my own spin on it so instead of using a white or grey nail polish like most people are doing, i decided to try a light purple colour. So this is how I achieved the look!!

First I applied my base coat. I used the Sally Hansens Hard as Nails nail hardener.


Then I applied Sally Hansens Hard as Nails in Lacey Lilac as my base colour.


Then I took a small piece of newspaper (enough to cover my nail) like the piece above ^^ and soaked it in rubbing alcohol. I just poured some of the rubbing alcohol into the lid of the container and used that to dip the newspaper pieces in. Then once the newspaper was wet with alcohol, I gently placed it onto my nail and pressed it down for about 30 seconds. You don't have to leave it that long but I did just to help transfer the lettering darker. I wanted the writing to really stand out. Make sure your not letting the newspaper slip around on your nail, you want it to stay in one place.


Then I applied Sally Hansens Insta-Dry over top of everything so that the writing stays put and gives it that nice glossy effect. Make sure you wait till everything is dry before applying it so that the writing doesnt get blurred.
Thanks for reading!


buying makeup off eBay

Anyone who knows me, knows that I am a huge fan of eBay. I buy a lot of makeup products off there because there are a lot of products that aren't available to me since I live in the middle of no where! So I resort to eBay because it's convenient for me and I find some amazing deals.

I'm gonna start off with some positives of buying products off eBay.

1. It's cheap, so for anyone on a budget it would be great for you.
2. You don't have to leave the comfort of your own home.
3. There are some great products on eBay.
4. You can find some interesting products you have never seen or heard of before.

Some of the negatives of buying makeup off eBay are...

1. Some of the products are knock offs
2. A lot of the time it takes about 3 weeks to get to you. (keep in mind that's going on my opinion, and I live in Canada so it could be different for different places)
3. You might not know EXACTLY where the product is coming from.


The best advice I can give to girls looking to buy makeup off eBay is to DO THERE HOMEWORK first. When I say that I mean to look into the product or brand first and compare to make sure they aren't buying a fake.

Don't just buy something before looking into the seller and their feedback from customers. They show their ratings for a reason so make sure you are looking at them because nobody likes to be ripped off.

Now I buy things from eBay quite often and I LOVE it. eBay allows me to try different things and not spend ALL my money.

So just make sure your looking into everything your buying! Thanks for reading!

Tuesday 2 August 2011

BB Cream!


These are 2 examples of what bb creams look like.


            BB Cream (or Blemish Balm Cream) is a type cream for your face that asian women are in love with! It is like a tinted moisterizer with a bit more coverage and a lot more benefits for your skin. People say that it was created in Germany by dermatologists to help people with serious skin conditions or people who may have had any surgery done to their face. It was created to help with the redness and scarring and things like that on peoples faces. When this product became available for the public, it became a big craze. To be honest, I can really understand why it became so popular so quickly.
One of the great things about bb cream is that it can actually help with acne WHILE giving you coverage and can help get rid of any acne scars you may have from the past.
Another plus to bb cream is that it helps whiten your skin. And i dont mean that it makes you pastey white, I mean that it helps to even out your skin tone and reduce redness.
BB cream is also beneficial for your skin because it is great for anti-aging as well as helping to reduce the look of fine lines that you might already have for your face.
The coverage of BB cream isn't AS GREAT as a foundation but it is definitly more coverage than a tinted moisterizer. So people who might have more acne than others may want to use concealer for extra coverage.
The bb cream formula also leaves your skin looking dewy and healthy.
I rarely ever use any foundation, I pretty much only use my bb cream and concealer if I need it.
A downfall to the bb cream is that the shades it comes in are very limited. The formula seems to be geared more towards girls with lighter skin rather than girls who have darker skin. I could be wrong (if i am wrong, someone please let me know!). I have looked at bb creams at many different sites on the internet like http://www.ebay.com/ and http://www.sasa.com/ and http://www.imomoko.com/ and have still yet to find darker shades.
Another downfall that I find with bb cream is that it tends to make my skin a bit more oily. Not like crazy oily or anything, but more oily than normal. I tend to have dry skin usually. I usually apply a light translucent powder over top to help with the oiliness.
Overall though I think BB cream was a great invention and we need to start getting it over to north america because it tends to be hard to find in stores. You can probably get it from sephora and unfortunately the closest one to me is about 4 hours away. :( wah wahhhh. I always buy my bb creams online. Much easier for me that way.
A lot of people who I talk to here in Canada have never even heard of bb cream and I want to make it a more well known product because I think everyone should be able to enjoy it! You can even buy bb creams for men as well which I think is so great!
This blog is getting quite long because there is so much to say so if i missed anything you should definitly look into bb cream and try it out and let me know what you think!! Thanks for reading!!!

Monday 1 August 2011

Olive oil and its benefits


Extra Virgin Olive Oil!

Olive oil is not just used for cooking, it is used for a lot of beauty related things as well. I have just recently discovered the benefits of oive oil over the past 3 months. I must say that I love the things that olive oil can do. You can purchase olive oil at any local grocery store.

You can use olive oil as a makeup remover. It makes getting stubborn makeup off an easy job. I know I have had trouble getting some of my waterproof mascaras off. Whenever I need to take my makeup off at night, I always reach for my olive oil. I just pour a small amount onto a small cotton pad and wipe it off. It comes off very easily.

You can also use olive oil as a moisterizer. What i do is splash warm water onto my face to help open up my pores to help all of the vitamins in the olive oil get into my skin really well. I pour a small amount of olive oil into my hand (a clean hand!) and rub my hands together to help warm up the olive oil a bit. Then I continuously rub it into my skin for about a minute to realy make sure I get it into my skin really well.
This technique is really good for your skin because it actually helps to control the oil on your face. it might sound like it will make your skin more greasy, but even people with oily skin need to moisterize and this will help. EVEN IF YOU HAVE OILY SKIN! Since there is so much nutrients and vitamins in olive oil, it can do wonders for your skin. It helps with the oiliness, it helps with anti-aging, it improves skins elasticity and it moisterizes.
I usualy use this before i go to bed so that the oil can soak into my skin while I'm sleeping. The olive oil will also help your makeup glide on smoothly. ANDDDD I almost forgot, but it is great for your lashes! It helps to condition them and really get all of the gunk or buildup in them which can help them grow longer.

You can also use olive oil as a scrub by adding granulated sugar to it. You can use it on just your face or your whole body. It will take off all of the dead skin cells and moisterize at the same time, leaving your skin feeling extremely soft.

Olive oil also does wonders for your hair. You can heat a small cup of olive oil in the microwave for about a minute and then apply it to dry hair. You shouldn't start right at your roots though, start a little ways down and make sure your hair is coated evenly. Then tie your hair back and let it sit for about an hour, then shower like you normally would and wash and condition your hair. It will leave your hair looking healthier and stronger andddd shiny. I usually do this about once every 2 weeks to pamper myself and help prevent any breakage in my hair. Especially during these hot summer days that can fry your hair.

I use all of these techniques myself and I love ALL OF THEM! You can buy olive oil for around $6 depending on the size, and it can be used for so many different things. I find that olive oil works better than my clinique makeup remover, which is quite a bit more expensive. I am an olive oil lover as you can tell and I will always stick by it.

Please try these techniques out and let me know what you think!! Thanks for reading!!!

Saturday 30 July 2011

Fun, Pretty, and Unique nails!!

Today I decided to try something a little different with my nails. I usualy stick with my standard plain one colour nail. Buttttt, today I decided to go with a bright blue nail with light purple polka dots, then on top of that, I added purple jewels just to add a bit of fun. As you can tell, I was extremely bored.


So first I started off with Sally Hansens 'hard as nails' in blue me away. This was my base colour.


Then I used Sally Hansens 'Hard as Nails' in Lacey Lilac to make polka dots. For the polka dots I used a dotting tool that I got in a nail art kit off of ebay. The dotting tool is the picture on your left above.


Then I used the nail glue from the nail art set and used a toothpick to gently add dots of glue onto some of the polka dots. This glue dries really quickly so I was doing about 2 dots at a time. Then I used the purple jewels in the centre picture above. I gently tapped a few of the jewels onto the table I was working at and used my finger to gently pick up each jewel one at a time. Then i carefully placed the jewel onto the dot of glue on my nail.


Then I used Sally Hansens 'Insta-Dri' top coat to help hold everything in place. On the above right is a picture of the final look.

I hope you all enjoyed this blog!!! :)


Thursday 28 July 2011

work makeup

I just wanted to talk a little bit about the makeup that some girls and women wear to work. If you do not work at a bar or as like a fashion model or something along those lines, then you don't need to PILE on the makeup. I can't even count the amount of times where I have walked into a Mcdonalds or a walmart or something and seen a girl with eyeliner and eyeshadow piled on. I know you want to look good and all but your making yourself look like your trying to hard. I work at subway and I find that all I need is mascara and maybe tinted moisterizer if I need the extra coverage. It's important to keep your makeup simple and professional while at work. People want to see a fresh face not and overload of makeup while they are grocery shopping and stuff like that. There is a girl who works at a store I love to shop at and, no word of a lie, she has BLACK eyeshadow up to her eyebrows and her hair is always wayyyy over teased. It makes me cringe. She would look so much nicer with a clean face and hair pulled back, not like she's ready to go out to the club. But I mean, that's just me. :)

My suggestion for work makeup would be to wear a tinted moisturizer, concealer (if needed), mascara, maybe a light colored eyeshadow and maybe chapstick or a light lip gloss. I wouldn't go too crazy.
That's about everything I can say about makeup in the workplace. Thanks for readinggg!

Wednesday 27 July 2011

elf black eyeliner pen

I took a trip over to the united states a little while ago and stopped at a target. I am from Canada and we don't have targets here. haha. So while I was there I picked up a few elf cosmetics. I figured since they were sooo incredibly cheap, I might as well give them a try. The one thing I was most excited to try was the eyeliner pen. I must say, it glides on really well and it's extremely easy to make a straight line. It's pretty hard to mess it up. Where as using a liquid eyeliner can be tricky and easy to make mistakes. Now this eyeliner pen is great for your upper lashline, I wouldn't use it on your lower lashline. Overall I really enjoy this product and it was only a dollar!! Which is amazing. For the price this is an amazing product. The only bad thing I would have to say about the eyeliner pen would be that the colour shows up pretty light. I would like it to be a lot darker. Although if you go over it a couple times it does get a lot darker. Thats about everything I have to say about the elf eyeliner pen. I would recommend this product to ANYONE!

Fake Mac eyeshadows


       A month ago I bought 3 fake MAC eyeshadows off of ebay. They were 99 cents each so I figured I would try them out just to see how well they worked. I got a dark green colour, a navy blue and a purple. There is a lot of hype on youtube about these fake MAC eyeshadows and to be careful what you are buying. For me, I actually don't mind the fake ones. It's not as good as real MAC eyeshadows but it is quite comparable and extremely affordable. The quality of the fake ones is actually quite nice and pretty pigmented. For being a dollar each, it's really not that bad.I haven't had any problems with them or noticed it to irritate my skin or anything like that. So that being said, I will continue to use them. It is bad to buy the fake products though, so I probably won't buy them again. But for anyone who is thinking about buying them, they really aren't that bad. Plus they are cheap.


                                                        left: fake MAC  right: real MAC

The difference between real MAC eyeshadows and the fake ones is the fake ones come with a sponge applicator and mirror on the bottom of the eyeshadow. the real MAC eyeshadows don't come with this. When I say the mirror and the applicator are on the bottom, I mean that when you open the eyeshadow there is another half to it where the mirror and applicator sit.
Anyways, really for a dollar it's not all that bad.

Tuesday 26 July 2011

The Crackle Nail polish craze! Review


            I recently purchased the Crackle nail; polish by Sally Hansen in 'Fuchsia Shock.' It was $5.99 at Zellers. I had been wanting to try the product for a while but never really got around to actually buying it until just the other day. When i tried it out, I used sally hansens white nail polish as a base coat and let it dry then I applied the crackle top coat over top. It was a bit frustrating for me at first because I wasn't quite sure how it worked. I did mess it up a couple of times but in the end I got it to work out. It turned out really nicely. It just takes a couple of tries to get used to it. Since it dries so quickly, I found that the nail polish that was actually on the brush applicator kept getting dry which made it hard to put on your nails. You really need to be quick about applying it. Overall, I'm really happy with this product and I love the effect it gave my nails. But you do need to be careful when applying it because the formula dries so quickly.