A lot of my friends ask me the same old questions about highlighting, which usually include: "What exactly is highlighting?" and "Why do people do it?".
Well highlighting your face means you use a light shimmery cream or powder to highlight the high parts of your face. The purpose of this is to help give your face dimension and by giving your face dimension by highlighting and contouring, it helps your face to appear slimmer. Highlighting isn't a technique I would suggest woman to use for their everyday makeup, but on special occasions like a date, a party or a evening out I would definitely suggest trying it out. I have a bit of a rounder face so I find it to make a huge difference when I contour and highlight my face.
So what areas of your face should you highlight?
The first area that I always encourage people to highlight is the inner corners of their eyes. This can make such a big difference in your look. It helps to make your eyes appear larger and brings a lot more attention to them. I usually use a white shimmery shadow and use my finger to dab it into my inner corners. You could also use a soft pink or grey on the inner corners, I use white because I already have very fair skin.
You can also highlight your brow bone as well, giving your eyes more depth and dimension. This helps keep more focus on your eyes.
The next area I would suggest is your cheek bones, this helps make them stand out and also gives you a healthy dewy look to your skin. For this area you could also use a shimmery shadow, but I would suggest a cream personally because you want your skin to have a healthy glow to it, using a shadow could make it look too matte and cakey.
Another area would be down the bridge of your nose. Personally I skip this part because I don't want any attention drawn to my nose. But for people interested in this step I would suggest to lightly use your choice of highlighter, cream or powder, and gently swipe it down the bridge of your nose to help your nose appear a bit slimmer and help to give you more of the dewy look.
The last area I suggest to people to highlight is right above your upper lip. This really helps to make your lips stand out more and make them appear fuller. I think it helps to give that pouty kind of look.
Thanks for reading!

Saturday, 24 November 2012


Monday, 9 July 2012
NEW BLOG!!
Hey everyone! Just wanted to write a brief post on my new blog page, Dear Prudence. I will still be posting here of course though!
I have collaborated with a friend of mine, Cassi Kennedy, who runs a fashion blog. We started a blog to help girls who are on a budget but still want to look nice, fashionwise and makeupwise.
So if you are interested, and if you like my blog then go check it out! Let me know what you all think and FOLLOW MY OTHER BLOG please! Thanks everyone!
Thanks for reading!
:D
Friday, 6 July 2012
Great Summer BB Cream
.jpeg)
In the summer it can be difficult for some girls to keep their skin looking fresh and flawless since it's hot outside and our makeup tends to melt off. Not a pretty look, am I right?
My suggestion for summer is to switch from your regular foundation to a tinted moisturizer, or a BB Cream. Garniers BB Cream (sold at walmart and drug stores) is a great choice for summer because it not only evens out your skin, but it provides spf for your skin of 15. Keeping your skin protected from the sun helps to prevent wrinkles in the future, so that's a plus.
BB Cream is actually better for your skin than foundation is because it doesn't clog your pores and actually helps to clear up acne and keep your skin moisturized.
The only downfall to this Garnier BB Cream is that I find it leaves my skin looking a little oily. But this is easy to take care of by just using some translucent powder in your T zone to get rid of some of the shine. I like to leave my cheeks looking a little dewy so I don't put any powder there.
BB Cream will help to give you a nice, natural glow for the summer rather than a cakey, runny mess. To read more on BB Cream check out my BB Cream blog post! Thanks for reading!!
joda
Sunday, 17 June 2012
M I A !!
Hey everyone!
I know I have been missing from my blog for the past little while. I was extremely busy finishing up my journalism degree and working. I took time away from my blog to get these other important things out of my way! So I successfully graduated from the journalism program in Windsor, Ontario!
I just wanted to thank everyone for still supporting my blog even while I have been missing! I will be continuing to update my blog and keep on posting on a weekly basis now that I am done school and not as occupied. I have a LOT more free time now so you can expect to see much more from me!
Thanks for reading! Love you's!
Joda
I know I have been missing from my blog for the past little while. I was extremely busy finishing up my journalism degree and working. I took time away from my blog to get these other important things out of my way! So I successfully graduated from the journalism program in Windsor, Ontario!
I just wanted to thank everyone for still supporting my blog even while I have been missing! I will be continuing to update my blog and keep on posting on a weekly basis now that I am done school and not as occupied. I have a LOT more free time now so you can expect to see much more from me!
Thanks for reading! Love you's!
Joda
Tuesday, 3 April 2012
Revlon Photoready Airbrush Mousse Foundation Review

A couple of months ago, a friend of mine told me about how much she loves this new airbrush foundation by revlon. Now some of you may or may have heard about it and I would like to say that I actually like this better then my mac studio sculpt foundation that I usually buy. I'll get into why I like this product better a little later.
So back to why I bought the product. I bought it because it was on sale at Rexall (where my friend works) and I decided that it was worth a try. Plus I get airmiles at Rexall so that may or may not have swayed my decision to buy this. I was a bit skeptical about the product when I was buying it because it is a mousse and I usually stay away from mousse because I don't usually find it does much for my skin.
The day after I bought the product, I decided to open it up and give er a go. At first I was a little unsure on how I should apply this because, again, it's a mousse. I was also unsure of how much of the product I was going to need. I gently pumped out some foam onto the back of my hand and decided to use a stippling brush to apply it which seemed to work pretty well. I find that I really only need a dime size amount of the product because one small pump does go a long way.
After I lost my stippling brush, I started using a regular foundation brush, which I actually like a lot better than my stippling brush which is surprising because I usually LOVE and rave about the stippling brush. With the regular foundation brush, I just gently press the brush into the product and using small strokes, apply it to my face. I would NOT suggest using your fingers to apply this product. Not even in an emergency situation would I use my fingers to apply this. I did it once, and I looked like an oompa loompa. Not cute at all.
Now on to why I choose this product over my mac studio sculpt that I usually buy. For the longest time I was only using my mac foundation, every once in a while I would try something new but I would always go back to my mac. Now don't get me wrong, i still love mac. I have been using this product for a few months now and I am on my second container of it. I was starting to find it a little stressful buying the mac foundation because in Canada, it costs me around $42 every time I need a new one, which as a student, has become a hard option for me. I knew I needed to try and find something a little cheaper.
This product works for me and I like it a bit better because it is very lightweight on my skin and doesn't make it look oily or anything like that. I also find that it lasts a long time and really stays on your skin well. The one bad thing I would say is that it can dry out your skin a bit, but I usually just put on a bit of primer or just some lotion before applying the foundation and I don't have any problems with it.
Again, everyones skin is different so this could be different for other people. I have very fair skin, and it tends to be on the dryer side. I do break out every so often and this foundation does a great job at hiding flaws without looking too cakey. So if you have skin similar to mine, you may want to try this out. It is a bit of a heavier coverage so keep that in mind if you are looking to try this product out.
This is a photo of me and a friend (I'm the blond on the right). I am wearing this foundation in this photo and as you can see it has great coverage for me and it still gives my skin a nice dewy kind of look to it. Not greasy, not dry, dewy. Just thought I would throw this photo in to give you guys an idea of what kind of coverage it gives.

Thanks for reading!! Have a Happy Easter everyone! If you celebrate Easter?
Monday, 2 April 2012
10,000 pageviews!
Hey everyone!
I just wanted to thank everyone for all of their support with the blog. I was really excited this weekend to see that I had reached 10,000 pageviews!
I never in a million years thought I would make it to 10,000 pageviews before summer hit, so thank you all again so much! I have been trying to blog as much as I possibly can, but it has been hard since I am in my last semester of Journalism. I have been extremely busy with my schooling and internship, so once summer hits I will be blogging A LOT more often. Since I have been busy, I am so pleasantly surprised by the 10,000 pageviews.
Anyways, I've babbled long enough. Thanks again!
I just wanted to thank everyone for all of their support with the blog. I was really excited this weekend to see that I had reached 10,000 pageviews!
I never in a million years thought I would make it to 10,000 pageviews before summer hit, so thank you all again so much! I have been trying to blog as much as I possibly can, but it has been hard since I am in my last semester of Journalism. I have been extremely busy with my schooling and internship, so once summer hits I will be blogging A LOT more often. Since I have been busy, I am so pleasantly surprised by the 10,000 pageviews.
Anyways, I've babbled long enough. Thanks again!
Thursday, 15 March 2012
Kim Kardashian Makeup Looks


I am not a huge fan of this look on Kim but I figured I would explain it for anyone who wishes to try it out. This look can work for certain people but not everyone can pull this off. So again, the foundation, then for the cheeks it looks like she is only wearing bronzer, and not so much blush. The eyes are the most important feature in this look. For her eyes, she has a dark grey eyeshadow on her lids then her eyes are lined all around. Then the eyeliner has been smudged down on her bottom lashline. You can achieve this smudged look by using a black or dark grey eyeshadow along the lower lashline as well. then top the look with your favourite mascara (I like falsies by maybelline). Then for the lips, use a nude lipstick and some gloss overtop. You could also use a bit of concealer on your lips if you don't have nude lipstick. This will help to keep all the attention on your eyes. I would say this is a night on the town kind of look.


Again, I love the red lip on Kim, this is look is a bit different then the other red lip look we saw. Her cheeks have a more defined blush look. I would use a blush that is a more reddish orange colour. Then for her eyes she has her top lashline lined and not the lower lashline like she usually does. Then for the eyelids again I would just use a bit of white or nude eyeshadow. Don't be shy with the mascara for this look since your bottom lashline isn't lined, you don't want to completely lose your eyes in the look. For the lips I would use a very vibrant blood red lipstick.
Thanks again for reading this blog! I hope you all enjoyed!
P.s. none of these photos were taken by me! They were found on the internet!
Monday, 27 February 2012
Taylor Swift Makeup Looks
Ever since Taylor swift hit the music scene with her album "Tim McGraw in 2006, I've been a huge fan. Since I was only about 15 years old at the time this album was release, I found the lyrics to be really easy to relate to.
I've always thought she was a really gorgeous girl, so I thought I would go through some of her makeup looks that I love. She is most famous for red lips and black cat-eye eyeliner look. I found some photos of her that show a few different looks.
.jpg)
I wanted to first start off this blog post by showing everyone a picture of Taylor Swift without makeup. She is clearly a naturally beautiful girl and could easily get away with no makeup.

I really love this look on taylor, it's very sweet and innocent looking. She has a nice faint pink blush on her cheeks and a beautiful peachy lip stick on which I think helps keep this look softer. For her eyes she has a shimmery light brown colour on the outer halves of her eyes then a white eyeshadow on the inner corners to help highlight. This is a simple look to achieve. She has her upper lash line lined with black eyeliner and slightly winged out on the ends. I love that she has the bottom lashline bare, I think it looks very elegant. Then of course to complete this look she has mascara.

This is an older picture of Taylor but I really like this look for her, it's a bit sexier look than her usual makeup looks. She has the smokey eyes and the pale pink lip, with a more bronzy glow. You can see in this look that the eye makeup is heavier than the picture before. She has dark grey almost black eyeshadow with is smoke out on the outer halves of her eyes. Then she has a lighter eyeshadow shade, you could use white eyeshadow or a light grey on the inner corners. Then she has her eyes lined all the way around this time which really helps make her eyes stand out here. Then OF COURSE mascara.

I chose this photo because she is actually wearing a bit of colour on her lids this time instead of neutral colours or smoky blacks and greys. It is a very dark, dramatic look on the eyes and it looks like she doesnt have any colour or gloss on her lips. Even her skin looks bare here which i LOVE. She may have a bit of blush on but it looks so natural that I'm going to say she isnt wearing any here. To get the look on her eyes I would first start off with a dark purple over the entire lid and go past your natural crease a bit. Then smoke out any harsh edges. Then I would take a black or dark grey eyeshadow over top of the lid but don't bring i t past your natural crease. You want it to look like the edges of the black or grey eyeshadow is fading out to a purple colour. Then I would take an angle brush and bring the dark purple onto the lower lashline then bring black eyeliner across my waterline. And finish it off with black mascara.

This is definitly one of my favourite Taylor Swift looks, I love the blood red lips and natural smokey eye. Her skin is absolutely flawless. It doesn't seem like she is wearing any bronzer but she does have a hint of peach blush, and I love that it's so subtle. Her lips are a blood red colour with a tiny hint of gloss over top but for the most part it's pretty matte. Her eyes have a deep brown on the outer corners and smoke out on the edges then a touch of highlighter in the inner corners of her eyes. Then She has her eyes lined all around again with a black eyeliner and topped off with mascara to complete the look.
Thanks again for reading my break down of Taylor Swifts makeup looks. I hope you all enjoyed it! Have a lovely day!
p.s. none of these photos were taken by me, they were all found on the internet.
Thursday, 12 January 2012
Urban Decay Book of Shadows IV Review
For Christmas I asked my parents for the Book of Shadows IV by Urban Decay. It was the only thing I asked for and I was extremely excited when I got it. I would like to start off by saying that I really REALLY enjoy this palette. If you have never used it or seen it, I definitly suggest checking it out.

The first thing I want to talk about is the packaging of it all. It comes in a protecting box with a great eye catching design on it. It's very creative and colourful and of course it's extremely cute. I think it's very girly and very different from any other palette I have seen. This palette goes above and beyond any other I've seen.

So when you open up the palette, this is what it looks like. ^^^ It has a mirror and pop up butterflies which I think is adorable. Again very different from other palettes. Then beside the mirror there is a little pouch for your phone and a little card with get the look codes on it. This whole palette has this kind of magical feel about it so it makes doing your makeup fun rather than just a chore.

So this is the card that comes with the palette. What you would do is scan these codes using your smart phone and it will bring up a video showing you how to get that particular look using the colours in this palette. They give you five different looks to choose from and they are all very different looks so it gives you a nice variety to choose from. I mean how many other palettes that you've seen have had this feature?

After opening the palette, you will see a purple flap on the front to pull on which pulls out the actually palette itself. It comes with 16 different coloured eyeshadows, a black 24/7 liquid liner, a mini mascara, a primer potion, a speaker to plug into your phone and of course the cords to go along with it. The colours this palette comes with are relly great because it comes with your nice every day kind of colours but it comes with your really fun bold colours as well. The only bad thing I would say is that a few of the colours have glitter in it and I found that I ended up getting it all over my face. Other than that I really like ALL of the colours. I also really enjoyed the liner, it's an amazing liner and when I run out I will definitly be buying another one. It stays on extremely well and I found it easy to apply. The mascara was a pretty good one but I still prefer my falsies by Maybelline.

This is the speaker that comes with the palette. This was one of the features about the palette that really made me want to try this palette because it was so unique. I thought it was a really great idea because you can use it to listen to the videos aloud or even just listen to music while your getting ready. Which I'm pretty sure most girls do. It even has a key chain on it so you can bring it around with you instead of keeping it with the palette itself.

Overall I really love this palette and I have found a few more products using this palette that I will definitly buy again. Like the liner, certain colours in the palette and the primer potion. Its extremely unique and fun. It's just something different to try and have fun with.
Thanks for reading!
Tuesday, 10 January 2012
Cover FX Total Coverage Cream Foundation

I was really intrigued by the cover fx cream foundation because I always hear very good things about that company. The lady tested it on my skin and showed me the look it gives. I decided to give it a try. It cost $38 but I also bought a brush with it. The brush that was suggested to use when applying the product is a somewhat fluffy brush but still dense which is supposed to help buff the product into your skin better.
- great coverage
- doesn't make skin look flaky
- don't feel the need for concealer as much
- it's almost impossible to make a mess with the foundation (like spill it or getting crusty in lid)
- comes in a nice container which is easy to carry around
- doesn't look too cakey on skin
- doesn't wear as long as I thought it would
- I found it hard to layer with other products like bronzer and blush
- the product transfers (comes off when I touch my face)
- takes longer to apply than other foundations

Monday, 5 December 2011
Gwen Stefani's makeup looks
GWEN STEFANI
I would like to first start off by saying that I am a HUGE fan of Gwen Stefani. I have always loved her music, her bold style, and her makeup looks. Gwen Stefani is so original and creative, she definitly stands out from other celebrities to me. That's what I love most about her, she isn't afraid to be herself!
So these are some of my favourite Gwen Stefani looks!

To me, this is a classic Gwen Stefani look. She has the bold red lip, with just the perfect amount of shine, not too shimmery, not too matte. She has black eyeliner along her top lashline and just a touch of black eyeliner on the bottom lashline. Then there is a shimmery white eyeshadow around her tear ducts. Her eyebrows look perfectly shaped and filled in with a light brown to go along with her white blonde hair. She doesn't wear to much colour on her cheeks. But I love her porcelain skin, it really works for her look. She has a bit of a rosy pink colour on her cheeks. This is a great evening look in my opinion, and it is an easy look to do. It's a five minute look that looks like you spent a lot of time doing.

This makeup look is almost the same as the one above (like I said "signature Gwen Stefani look"). The only thing that is really different in this look is she has more eyeliner on her bottom lash line than in the other picture. Her cheeks also look a bit more bronzy here. What I really liked about this look was her hair and her statement necklace. I love how she can pull anything off. Her hair is so unique and quorky but it really does work. If it was any other celebrity with their hair like this I would be like "What the heck were they thinking!" But for Gwen I make an exception. Like how do you get a bun to sit that perfectly on the top of your head?

I think this is a gorgeous look on Gwen. It's different than what she would usually do with her makeup, but it's nice to see her switch it up every once in a while. She has heavy eyeliner on her bottom lashline as well as her top lashline. The thing that really sticks out to me in this picture is her nude lips, since she is known for her red lip. She has a bit of gloss on her lips and maybe a hint of lip liner. Her cheek bone is very defined in this picture which looks very flattering. Her hair has been teased and kind of combed over a bit then flowers added to it makes it look so pretty.

This look is so different from her usual look because first of all, she has no red lip, and second of all, she doesn't always wear her eyeliner that thick. I think she looks more toned down here than she normally looks, which is kind of nice for a change. She has very thick black eyeliner on her top lashline then white eyeliner along the bottom lashline and of course mascara. Then she has a pale pink lip with a touch of gloss to finish the look. Again looks beautiful but doesn't take much time.
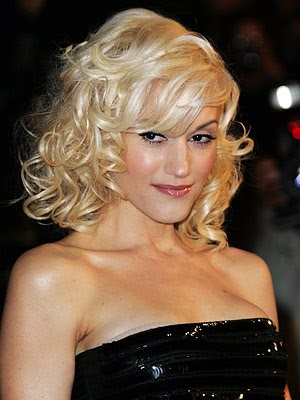
This is a very flattering look on Gwen and would also be flattering on anyone really. She has lovely dewy skin here and a nice bronzy, pink glow. The lip colour is very different from what we have seen before which is either red lip or pale lip. This is a more pinky natural colour. She has the eyeliner along her tp lashline again and a touch along the bottom but not too much. She has long eyelashes and almost no eyeshadow. Maybe a pale peach or white, it's kind of hard to tell. She looks so glowy in this picture, its stunning.
Over all, when looking through pictures of Gwen, I noticed she doesn't really play too much with coloured eyeshadows. I might like to see more colour on her eyes in the future but still, anything she does, she always pulls it off really well.
Thanks for reading!
p.s. none of these photos were taken by myself, they were all found online.
p.s. none of these photos were taken by myself, they were all found online.
Wednesday, 30 November 2011
Beauty photography
Hey everyone,
So I've been thinking about expanding my blogger acount with an additional blog for beauty photography. It would be less writing, and more photos. I've been thinking about starting this up for a little while now because I do love photography as well as beauty so I figured why not put the two together. It wouldn't be just regular beauty shots, it would be more intricate makeup. I'm going to try to record us doing the makeup and post those on youtube for those of you who would like to see how we created the looks. I want to go to extremes with makeup and really have fun with it. I have so many wild, fun colours that I have been dying to try but haven't found a place to wear them yet so this is my chance to really utilize all of my products and tools. I'm super excited about this project and I hope everyone else is too.
Please let me know what you think of this idea! If you have any suggestions or if you think it's a bad/good idea, PLEASE let me know!
Thanks for reading!
So I've been thinking about expanding my blogger acount with an additional blog for beauty photography. It would be less writing, and more photos. I've been thinking about starting this up for a little while now because I do love photography as well as beauty so I figured why not put the two together. It wouldn't be just regular beauty shots, it would be more intricate makeup. I'm going to try to record us doing the makeup and post those on youtube for those of you who would like to see how we created the looks. I want to go to extremes with makeup and really have fun with it. I have so many wild, fun colours that I have been dying to try but haven't found a place to wear them yet so this is my chance to really utilize all of my products and tools. I'm super excited about this project and I hope everyone else is too.
Please let me know what you think of this idea! If you have any suggestions or if you think it's a bad/good idea, PLEASE let me know!
Thanks for reading!
Wednesday, 16 November 2011
The stippling brush

One of my latest favourite tools has been the stippling brush. I had heard a lot about the brush on YouTube and other blogs. So I decided to buy one off of eBay for around $4.00. Since I have started using the brush, it has been the only thing I have used to apply my foundation because it gets into every little crease and crevice on your face and gives you a flawless airbrushed look. On days where I'm just going to school or work, I don't like to wear heavy foundation so I will use a tinted moisterizer and use the stippling brush to apply it to my face. On weekends when I'm going out and I do want the extra coverage I use a high coverage foundation. Either way, the stippling brush does the job.
Now you might be thinking, "okay this brush sounds great, but how do you use it?"
So here's how you use the brush.....
1. I apply foundation to the back of my hand. You could use a plate or something else if you like, me personally, I like to use my hand.
2. I take the brush and dab it into the foundation, you don't need to press it hard into the foundation, just lightly so it picks it up on the tips of the bristles of the brush.
3. Then you dab it all over your face. It will look kinda funny at this point but in the end it looks nice. Again, DO NOT press hard just lightly dab it onto your skin.
4. Then you are going to take your brush and swirl the bristels into your skin to blend it in really well. I find that this gives an amazing finish, I like it a lot better than using my fingers or a brush. But that's my opinion, not everyone will feel the same way.
It seems like it seems like it will take a long time to apply your foundation this way, but once you get used to doing it, it doesn't take all that long. It's the results that count!
If anyone has any questions about the stippling brush just ask!!
Thanks for reading!
Monday, 14 November 2011
Celebrity Makeup
I was reading some stories about celebrities online today when I decided to look at the makeup some celebrities have been wearing this year to get some inspiration. I found three looks that I think are absolutely beautiful.

I think the look that Gwen Stefani is wearing here is absolutely gorgeous, and unique!! I have to admit I am a HUGE fan of Gwen Stefani! She is a beautiful lady! Now I really like this look because it's really quite simple, its just a dark smokey eye with a bright pink lip. I am in love with bright pink lipstick lately so I am loving this look here. The dark eye makup really makes her eyes stand out on her face but the bright pink lip also stands out too. This is a very sexy look and definitly something I would wear on a night downtown to the clubs or a party.


I LOVE this makeup look because she kept it extremely simple. It seems like they kept her makeup pretty natural looking so her dress would be the main focus. It really shows how beautiful Amy Adams is naturally. This look is great for daytime and work. It is simple but elegant, not overdone. She has a natural coloured lip, lightly lined eyes, and a lovely rosey cheek. Perfect. It's simple and looks effortless. The main idea here is to work at creating perfect skin, then add a touch of blush, lip gloss, mascara and maybe a bit of liner.

I think the look that Gwen Stefani is wearing here is absolutely gorgeous, and unique!! I have to admit I am a HUGE fan of Gwen Stefani! She is a beautiful lady! Now I really like this look because it's really quite simple, its just a dark smokey eye with a bright pink lip. I am in love with bright pink lipstick lately so I am loving this look here. The dark eye makup really makes her eyes stand out on her face but the bright pink lip also stands out too. This is a very sexy look and definitly something I would wear on a night downtown to the clubs or a party.

I chose this picture because again, this is a simple look. Now normally Taylor Swift keeps her makeup looks pretty innocent looking and pretty. But, with this look, she went a bit more on the sexy side with the dark lined eyes. It is a very pretty look with a light coloured lip. She doesn't wear a stand out lip colour in this picture so her eyes are really the main focus. Her skin is absolutely flawless and dewy which is absolutely gorgeous!

I LOVE this makeup look because she kept it extremely simple. It seems like they kept her makeup pretty natural looking so her dress would be the main focus. It really shows how beautiful Amy Adams is naturally. This look is great for daytime and work. It is simple but elegant, not overdone. She has a natural coloured lip, lightly lined eyes, and a lovely rosey cheek. Perfect. It's simple and looks effortless. The main idea here is to work at creating perfect skin, then add a touch of blush, lip gloss, mascara and maybe a bit of liner.
Sunday, 13 November 2011
My Top Three Favourite Youtube Makeup Gurus
I would like to first start off by saying that all three of these girls are amazingly talented! They are all really positive and I feel that they are really genuine people. Rather than some youtube gurus I see who seem snobbish and stuck up.
So my number one favourite makeup guru on youtube is......
KANDEE JOHNSON!!!!!!
If you have never heard of Kandee Johnson before, you need to go to youtube search Kandee Johnson and watch her videos then come back and finish reading this blog.
She has so much talent and I have seen such a wide variety of different makeup videos that any girl could wear. Kandee is so pretty it hurts sometimes. She is very in with the latest trends in makeup and is always creating new, amazing looks. She has been on youtube for quite some time now and I'm pretty sure I have watched all of her videos. EVERY SINGLE ONE!! She has such a positive personality and she is also a very original person. Her videos always make me smile and laugh. They always leaving me feeling very positive because that's the type of person she is. i can't even describe to you how much of a fan i am of hers. So if you haven't checked her out yet, you better go do so.
My second favourite makeup guru on youtube is........
MICHELLE PHAN!!!!!!!
Michelle is a beautiful BEAUTIFUL woman. She is so incredibly talented when it comes to makeup it's unbelievable. She makes everything look so effortless and perfect. Doing makeup is something this girl was born to do. She is extremely creative and quorky. Like Kandee, Michelle has been around on youtube for a very long time as well. I watch almost all of her videos. They are very original and not something you are going to find everyday on youtube. You can always count on Michelle when you want to find a creative one of a kind makeup look.
My third favourite makeup guru on youtube is......
PROMISE PHAN!!!!!
I think Michelle and Promise are probably pretty much tied. Promise is married to Michelles brother which is why they have the same last name. No they aren't sisters. Just sister in laws I guess. ANYWAYS, Promise is an extremely sweet girl and like Michelle, makeup comes to her very easily. And the girl can wear any makeup and it will look good one her!! The thing I love most about Promise is how she makes a lot of videos called "transformations" where she makes herself look like different celebrities or cartoons. It's really amazing how she can actually transform herself to look like someone else. Her youtube channel is definitely one I would suggest to people to look up. She is extremely amazing and its absolutely incredible how she transforms herself. She has so many transformation videos from taylor swift, to kim kardashian, and even bellatrix lestrange from Harry Potter. I always keep my eye out for new videos from her because I know it will be very entertaining and original. You can really see how much work she puts into her videos which tells me that she loves what she does.
So my number one favourite makeup guru on youtube is......
KANDEE JOHNSON!!!!!!
If you have never heard of Kandee Johnson before, you need to go to youtube search Kandee Johnson and watch her videos then come back and finish reading this blog.
She has so much talent and I have seen such a wide variety of different makeup videos that any girl could wear. Kandee is so pretty it hurts sometimes. She is very in with the latest trends in makeup and is always creating new, amazing looks. She has been on youtube for quite some time now and I'm pretty sure I have watched all of her videos. EVERY SINGLE ONE!! She has such a positive personality and she is also a very original person. Her videos always make me smile and laugh. They always leaving me feeling very positive because that's the type of person she is. i can't even describe to you how much of a fan i am of hers. So if you haven't checked her out yet, you better go do so.
My second favourite makeup guru on youtube is........
MICHELLE PHAN!!!!!!!
Michelle is a beautiful BEAUTIFUL woman. She is so incredibly talented when it comes to makeup it's unbelievable. She makes everything look so effortless and perfect. Doing makeup is something this girl was born to do. She is extremely creative and quorky. Like Kandee, Michelle has been around on youtube for a very long time as well. I watch almost all of her videos. They are very original and not something you are going to find everyday on youtube. You can always count on Michelle when you want to find a creative one of a kind makeup look.
My third favourite makeup guru on youtube is......
PROMISE PHAN!!!!!
I think Michelle and Promise are probably pretty much tied. Promise is married to Michelles brother which is why they have the same last name. No they aren't sisters. Just sister in laws I guess. ANYWAYS, Promise is an extremely sweet girl and like Michelle, makeup comes to her very easily. And the girl can wear any makeup and it will look good one her!! The thing I love most about Promise is how she makes a lot of videos called "transformations" where she makes herself look like different celebrities or cartoons. It's really amazing how she can actually transform herself to look like someone else. Her youtube channel is definitely one I would suggest to people to look up. She is extremely amazing and its absolutely incredible how she transforms herself. She has so many transformation videos from taylor swift, to kim kardashian, and even bellatrix lestrange from Harry Potter. I always keep my eye out for new videos from her because I know it will be very entertaining and original. You can really see how much work she puts into her videos which tells me that she loves what she does.
Thursday, 27 October 2011
My face makeup routine
When I go to do my makeup everyday, the most important thing for me is to start off with a flawless looking canvas. I know a lot of girls just slap on some foundation and call it a day. A lot of people might watch me do my makeup and be like "what in the H is she doing?". I take a lot of steps in my face makeup routine but it is well worth it. I notice a lot of girls makeup looking cakey or not the right clour for their skin. It is important to know how to achieve great looking skin using makeup.
So, here is my routine,
step one: I always start off with a fresh clean face. I can't stress this enough to people, you need to clean off ALL of your makeup from the night before!! It's so important!
step two: I use a moisterizer or a primer to prep my skin. I almost always reach for a moisterizer to prep my skin, but you can always use primer if thats what you like. I like to use St. Ives Moisterizer with vitamin E. Vitamin E is really great for your skin because it helps with acne scars and healing any acne on your face. I have really dry skin so moisterizer works really well for me. I would normally give the moisterizer a few minutes to really soak into my skin before i continue with the rest of my routine.
step 3: Next, I use a bb cream and I apply it evenly over my entire face and neck. I make sure there are no harsh edges and that it is blended really well into my hairline and around my ears. If you don't know what bb cream is then you can go check out my other blog on bb creams. I am a huge supporter of bb creams and I think everyone should use it. It is basically a tinted moisterizer that has a bit more coverage than most tinted moisterizers.
step 4: This step I skip on a day to day basis, I only do this step if I'm going out at night or I just want the extra coverage. I take my favourite MAC foundation and apply some to the back of my hand and use my stippling brush to stipple it all over my face. I like using a stippling brush because it really gets into every angle and crease to give you great, airbrushed looking coverage.
step 5: I use concealer at this point. I know a lot of people do it before foundation but I like to do it after foundation but before powder. Now I always use one of my high end concealers at this point so it usually blends really well into my skin tone. This could be different for other people. The places on my face I usually conceal is, under my eyes, around my nose (because it tends to be red) my eyelids to help conceal any veins and to create a base for eyeshadow, and then of course any blemishes I may have on my face.
step 6: I take a highlighter and put it on all the HIGH parts of my face. I put it down the centre of my nose, across my cheek bones, my brow bones, right about my upper lip, and just a bit on my chin. This gives a great dewy look to your skin. It helps everything look natural and not like you put a lot of effort into your makeup.
step 7: I take a face powder and apply it over my entire face and jawline to set myy foundation, concealer and highlighter.
step 8: Then I take my clinique bronzer (which is amazing!) and I LIGHTLY dust it over my entire face. I have very fair skin, and I am very picky about bronzer because it always ends up being very dark on me. I chose this clinique bronzer because it is close to my skin tone. My face is a bit lighter than the skin on the rest of my body so this is why I apply it over my entire face, to help it match. This bronzer also doesnt have much glitter in it so it doesnt look silly over your entire face. I use a kabuki brush for this.
step 9: Then I take the same bronzer and use a thinner, fluffy face brush. I suck in my cheeks and I use the bronzer as a contour for my cheeks. I make sure to blend this out really well. You dont want any harsh lines on your face. Keep it natural! This helps your face look slimmer and more contoured.
step 10: The final step in my routine is blush. Again, I have fair skin, so I always go for a light pink blush. I like to use elf blush products, they are very easy to blend and don't overpower my skin.
So this completes my routine, I didn't plan for it to work out to be ten steps. HAHA! I hope this helps someone out there. If anyone has any questions please feel free to ask me.
Thanks so much for reading everyone! :)
So, here is my routine,
step one: I always start off with a fresh clean face. I can't stress this enough to people, you need to clean off ALL of your makeup from the night before!! It's so important!
step two: I use a moisterizer or a primer to prep my skin. I almost always reach for a moisterizer to prep my skin, but you can always use primer if thats what you like. I like to use St. Ives Moisterizer with vitamin E. Vitamin E is really great for your skin because it helps with acne scars and healing any acne on your face. I have really dry skin so moisterizer works really well for me. I would normally give the moisterizer a few minutes to really soak into my skin before i continue with the rest of my routine.
step 3: Next, I use a bb cream and I apply it evenly over my entire face and neck. I make sure there are no harsh edges and that it is blended really well into my hairline and around my ears. If you don't know what bb cream is then you can go check out my other blog on bb creams. I am a huge supporter of bb creams and I think everyone should use it. It is basically a tinted moisterizer that has a bit more coverage than most tinted moisterizers.
step 4: This step I skip on a day to day basis, I only do this step if I'm going out at night or I just want the extra coverage. I take my favourite MAC foundation and apply some to the back of my hand and use my stippling brush to stipple it all over my face. I like using a stippling brush because it really gets into every angle and crease to give you great, airbrushed looking coverage.
step 5: I use concealer at this point. I know a lot of people do it before foundation but I like to do it after foundation but before powder. Now I always use one of my high end concealers at this point so it usually blends really well into my skin tone. This could be different for other people. The places on my face I usually conceal is, under my eyes, around my nose (because it tends to be red) my eyelids to help conceal any veins and to create a base for eyeshadow, and then of course any blemishes I may have on my face.
step 6: I take a highlighter and put it on all the HIGH parts of my face. I put it down the centre of my nose, across my cheek bones, my brow bones, right about my upper lip, and just a bit on my chin. This gives a great dewy look to your skin. It helps everything look natural and not like you put a lot of effort into your makeup.
step 7: I take a face powder and apply it over my entire face and jawline to set myy foundation, concealer and highlighter.
step 8: Then I take my clinique bronzer (which is amazing!) and I LIGHTLY dust it over my entire face. I have very fair skin, and I am very picky about bronzer because it always ends up being very dark on me. I chose this clinique bronzer because it is close to my skin tone. My face is a bit lighter than the skin on the rest of my body so this is why I apply it over my entire face, to help it match. This bronzer also doesnt have much glitter in it so it doesnt look silly over your entire face. I use a kabuki brush for this.
step 9: Then I take the same bronzer and use a thinner, fluffy face brush. I suck in my cheeks and I use the bronzer as a contour for my cheeks. I make sure to blend this out really well. You dont want any harsh lines on your face. Keep it natural! This helps your face look slimmer and more contoured.
step 10: The final step in my routine is blush. Again, I have fair skin, so I always go for a light pink blush. I like to use elf blush products, they are very easy to blend and don't overpower my skin.
So this completes my routine, I didn't plan for it to work out to be ten steps. HAHA! I hope this helps someone out there. If anyone has any questions please feel free to ask me.
Thanks so much for reading everyone! :)
Wednesday, 7 September 2011
my new favourite product
The other day I went to the mall with a friend and as we were wandering around I saw the LUSH store. I have been in the store before but I was very turned off by their prices. I looked at the soaps and i was like "ten dollars for soap?! Thats crazy," but i had heard from another friend about how great their products are. So i decided to give LUSH another try. As I started looking at things rather than prices I realized I was in trouble because I wanted to buy EVERYTHING!!
In the end I settled for a solid body tint in black stockings, a twilight bath bomb and a lip scrub in sugar lips. I absolutely love all 3 products.

The one that stands out most to me is the solid body tint in black stockings. I had never seen anything like it before and once I tried some on my skin, i knew instantly that i needed to buy it. It was $8.95. It seems a bit expensive, but i know that this bar will last me a longggg time. The great thing about this body tint is the fact that it moisterizes your skin as well as gives you a subtle shimmery glow. Its great for people like me who have very fair skin because it just gives you such a beautiful sun kissed look. I also like that it is a very subtle shimmer rather than an overload on sparkle which looks fake and silly to me. This product gives a more natural sun kissed look.
You might be asking yourself, "how do you use a solid body tin?" Well, all you have to do is take the small heart bar and rub it onto your skin, then use your hand to kind of smooth it around a bit. You can use it basically anywhere you want. I use it mostly on my face and arms, but I have used it on my legs as well.
This is probably one of my favourite buys from this summer! I would recommend that EVERYONE try it!! Let me know what you think of course.
The bar is also very portable, I just leave it in the LUSH bag it came in and throw it into my purse or makeup bag and I'm good to go. It takes like 10 seconds to apply and it smells AH-MAZING!! It's a very sweet but spicy smell at the same time because it has spicy pimento berry oil and cinnamon in it. This will definitly be something I will probably buy over and over and OVER again! This is how much I love it. I seriously can't praise this product enough. Of course, I could be different than other people and everything in this blog is all my opinion so some people might love it as much as me but others might hate it. YOU NEVER KNOW!
Thanks for reading!!!
In the end I settled for a solid body tint in black stockings, a twilight bath bomb and a lip scrub in sugar lips. I absolutely love all 3 products.
The one that stands out most to me is the solid body tint in black stockings. I had never seen anything like it before and once I tried some on my skin, i knew instantly that i needed to buy it. It was $8.95. It seems a bit expensive, but i know that this bar will last me a longggg time. The great thing about this body tint is the fact that it moisterizes your skin as well as gives you a subtle shimmery glow. Its great for people like me who have very fair skin because it just gives you such a beautiful sun kissed look. I also like that it is a very subtle shimmer rather than an overload on sparkle which looks fake and silly to me. This product gives a more natural sun kissed look.
You might be asking yourself, "how do you use a solid body tin?" Well, all you have to do is take the small heart bar and rub it onto your skin, then use your hand to kind of smooth it around a bit. You can use it basically anywhere you want. I use it mostly on my face and arms, but I have used it on my legs as well.
This is probably one of my favourite buys from this summer! I would recommend that EVERYONE try it!! Let me know what you think of course.
The bar is also very portable, I just leave it in the LUSH bag it came in and throw it into my purse or makeup bag and I'm good to go. It takes like 10 seconds to apply and it smells AH-MAZING!! It's a very sweet but spicy smell at the same time because it has spicy pimento berry oil and cinnamon in it. This will definitly be something I will probably buy over and over and OVER again! This is how much I love it. I seriously can't praise this product enough. Of course, I could be different than other people and everything in this blog is all my opinion so some people might love it as much as me but others might hate it. YOU NEVER KNOW!
Thanks for reading!!!
Tuesday, 6 September 2011
which cosmetic could I not live without?
I was thinking this morning on my way to school about what kind of makeup product I could never live without. So I thought about it and which product would make help the most if I couldn't have anything else.
No it wasn't foundation or concealer, not lipgloss or eyeshadow. I felt like the product that would benefit me most if I could only use one would be mascara.
Mascara made the most sense for me because it helps give girls that more feminine look. It gives girls a pretty yet simple look.
It wouldn't matter if I had a zit or redness because I would have mascara on which would bring more attention to my eyes rather than any blemishes I may have.
Mascara is my favorite part of my makeup routine because it helps make your eyes look so big and doll like.
I wanted to talk about this today to help get everyone thinking, so think long and hard about what product or makeup tool you couldn't live without. You can only pick one!!
Thanks for reading!
No it wasn't foundation or concealer, not lipgloss or eyeshadow. I felt like the product that would benefit me most if I could only use one would be mascara.
Mascara made the most sense for me because it helps give girls that more feminine look. It gives girls a pretty yet simple look.
It wouldn't matter if I had a zit or redness because I would have mascara on which would bring more attention to my eyes rather than any blemishes I may have.
Mascara is my favorite part of my makeup routine because it helps make your eyes look so big and doll like.
I wanted to talk about this today to help get everyone thinking, so think long and hard about what product or makeup tool you couldn't live without. You can only pick one!!
Thanks for reading!
My first day back to school look!!
Today was my first day back to college for my last year of Journalism. I was really nervous to go back to school, but excited at the same time. The night before, I was trying to plan out what I was going to wear and how I was going to do my makeup. I didn't want to be too fancy or too over the top. I wanted to look cute, but professional at the same time. Afterall, I'm not in high school anymore.
So starting off with my outfit from the bottom up. On my feet I wore a pair of gladiator style sandals from aldo. These shoes are my all time favourite shoes!
For pants, I wore a dark wash pair of skinny jeans from Sirens Fashions. I have had these jeans for like 3 years and I still love them.
\
For my shirt I wore a slouchy bright blue quarter length sleeve shirt. It's very lightweight and soft material. It looks very nice for school but its still comfortable at the same time. I bought the shirt a couple weeks ago at Urban Behaviour for around $8.00 which was really cheap so I bought it in white as well. lol!
For a necklace I wore a seahorse necklace on a silver coloured chain. I wore this because me and one of my best friends bought them as best friend necklaces and we promised each other we would wear them on our first day of school this year as good luck. Silly? I know but hey, no one ever really completely grows up right. Plus the necklace added a little bling to my outfit.
For makeup, I did my usual face makeup routine with bb cream, concealer, powder finish, bronzer and a bit of blush. I wanted to keep things simple because my program is more of a business environment so I just wore a shimmer white shadow to help make my eyes stand out, then my falsies mascara by maybelline and mac's black eyeliner. So nothing too crazy with the makeup today. I kept my hair pin straight today just to give that polished off look.
Overall, I really liked my look today. I got a lot of compliments from the other girls at school so I think it was successful! :) Check out my twitter account to see pictures of my outfit!
Thanks for reading!
So starting off with my outfit from the bottom up. On my feet I wore a pair of gladiator style sandals from aldo. These shoes are my all time favourite shoes!
For pants, I wore a dark wash pair of skinny jeans from Sirens Fashions. I have had these jeans for like 3 years and I still love them.
\
For my shirt I wore a slouchy bright blue quarter length sleeve shirt. It's very lightweight and soft material. It looks very nice for school but its still comfortable at the same time. I bought the shirt a couple weeks ago at Urban Behaviour for around $8.00 which was really cheap so I bought it in white as well. lol!
For a necklace I wore a seahorse necklace on a silver coloured chain. I wore this because me and one of my best friends bought them as best friend necklaces and we promised each other we would wear them on our first day of school this year as good luck. Silly? I know but hey, no one ever really completely grows up right. Plus the necklace added a little bling to my outfit.
For makeup, I did my usual face makeup routine with bb cream, concealer, powder finish, bronzer and a bit of blush. I wanted to keep things simple because my program is more of a business environment so I just wore a shimmer white shadow to help make my eyes stand out, then my falsies mascara by maybelline and mac's black eyeliner. So nothing too crazy with the makeup today. I kept my hair pin straight today just to give that polished off look.
Overall, I really liked my look today. I got a lot of compliments from the other girls at school so I think it was successful! :) Check out my twitter account to see pictures of my outfit!
Thanks for reading!
Monday, 8 August 2011
My Beauty Diary Face Masks! How to use them
I have recently discovered the asian face masks called my beauty diary. they are really popular in asian countries. I was hearing and seeing a lot about them over youtube so I decided to try some out.
I bought 2 different kinds, the green apple masks and strawberry yogurt masks.
The green apple masks are supposed to help with tightening pores. I'm not sure how well it really tightened my pores though. However, it did make my skin feel really soft afterwards.
The strawberry yogurt masks are for whitening and brightening, as well as moisterizing your skin. I really love this mask, it smells fantastic (literally smells exactly like strawberry yogurt!), really does whiten my skin and definitly moisterizes it.
All of the my beauty diary masks are sheet masks and they say to leave them on for about 25-30 minutes. I like to leave mine on for around 40 because i find that it works better that way.
Each mask is individually packaged and is coated in serum. After I apply the masks, I like to put any extra serum left in the package on my neck. I just put the serum in my hand and massage it into my neck.
After taking the mask the mask off you are not suuposed to wash any of the serum off your face. You just leave the serum on your face to soak in. I like to massage my face for about a minute afterwards to really make sure that the serum gets into my skin really well.
Overall I really love these mask and i would recommend them to anyone. The only thing bad I could say is that the instructions on the packaging arent that easy to read because its in a different language. I mostly found out how to use it by looking it up online.
Definitly worth a try! Thanks for readinggg :)
I bought 2 different kinds, the green apple masks and strawberry yogurt masks.
The green apple masks are supposed to help with tightening pores. I'm not sure how well it really tightened my pores though. However, it did make my skin feel really soft afterwards.
The strawberry yogurt masks are for whitening and brightening, as well as moisterizing your skin. I really love this mask, it smells fantastic (literally smells exactly like strawberry yogurt!), really does whiten my skin and definitly moisterizes it.
All of the my beauty diary masks are sheet masks and they say to leave them on for about 25-30 minutes. I like to leave mine on for around 40 because i find that it works better that way.
Each mask is individually packaged and is coated in serum. After I apply the masks, I like to put any extra serum left in the package on my neck. I just put the serum in my hand and massage it into my neck.
After taking the mask the mask off you are not suuposed to wash any of the serum off your face. You just leave the serum on your face to soak in. I like to massage my face for about a minute afterwards to really make sure that the serum gets into my skin really well.
Overall I really love these mask and i would recommend them to anyone. The only thing bad I could say is that the instructions on the packaging arent that easy to read because its in a different language. I mostly found out how to use it by looking it up online.
Definitly worth a try! Thanks for readinggg :)
Subscribe to:
Posts (Atom)